
How to Use PIM with RBAC Roles: Purview, Exchange, and More
- Nov 11, 2025
- 9 min read
Updated: Feb 28

Acknowledgements & Inspiration
I’m flattered when I see how my earlier posts can inspire others to start writing their own content. It’s always great hearing that kind of feedback.
Recently, I was tagged in a post by Ivan Klbik, who wrote an excellent article about using PIM with RBAC roles. His post was inspired by two earlier pieces from the Purview community:
Ivan’s work completes that “trilogy” beautifully, focusing on how to assign Purview roles securely and temporarily using Just-In-Time (JIT) access through Microsoft Entra ID PIM - definitely worth checking out!
I also want to give a shoutout to Nikki Chapple, who originally wrote about using Just-In-Time access for other roles a few years back (link here).
I don’t want to reinvent the wheel but I’ve always wanted my blog to serve as a one-stop shop for the topics I cover. It frustrates me when I have to jump through 20 different Microsoft Learn articles just to understand how to set something up end-to-end. So, since I’ve got a few extra insights to add on top of what Ivan and Nikki have already shared, I thought I’d contribute my two cents to the conversation and hopefully someone finds it useful.
Introduction
If you’re managing Microsoft 365 or Purview roles, you’ve probably struggled with giving users enough access without handing out permanent admin privileges. That’s where PIM (Privileged Identity Management) comes in.
In this post, I’ll show you how to use PIM with RBAC (Role Based Access Control) roles, including Purview, and more; to provide just-in-time access, group multiple roles together, and maintain a safer environment. I’ll also cover limitations, licensing requirements, provisioning nuances, and why sometimes you need to pick the “lesser evil” in security.
Table of Contents
What is Privileged Identity Management (PIM)?
Privileged Identity Management (PIM) is a service in Microsoft Entra ID that helps you manage, control, and monitor access to important resources in your organisation.
PIM is your friend if you want to reduce the risk of over-privileged accounts. It lets you:
Grant time-bound access to roles
Require approval or justification for role activation
Enforce multi-factor authentication (MFA)
Conduct access reviews
Get audit logs for compliance purposes
It provides just-in-time (JIT) access instead of permanent admin rights, which is crucial when dealing with sensitive resources.
Why use PIM with RBAC roles?
Permanent access = more risk. Just-in-time access = safer.
Using PIM with RBAC:
Reduces excessive privileges
Helps control access to sensitive data
Allows grouping multiple roles under one Entra ID group, so one activation = multiple roles activated
Makes audits simpler because access automatically expires
This method works for:
Purview RBAC roles
Teams RBAC roles
SharePoint roles
And many other Microsoft 365 roles
License Requirements
To use PIM for Microsoft Entra roles or PIM for Groups, your users need Entra ID Premium P2 licences (or above). Reference: https://learn.microsoft.com/en-us/entra/id-governance/licensing-fundamentals#features-by-license

PIM for Groups: Overview
PIM for Groups lets you manage just-in-time membership or ownership of Entra security groups or Microsoft 365 groups. These groups can control access to:
Microsoft Entra roles
Azure roles, Azure SQL, Azure Key Vault
Intune, and other apps
You can apply policies like:
Require approval for membership/ownership activation
Enforce MFA
Require justification
Limit maximum activation time
Fun fact: Up until January 2023, PIM for Groups was called Privileged Access Groups (PAG).
Role-assignable vs non-role-assignable groups
Role-assignable groups: only Global Admins, Privileged Role Admins, or group Owners can manage. Adds extra protections against privilege elevation.
Non-role-assignable groups: various admins can manage and change credentials of active members. Less secure for sensitive roles.
I have covered the role-assignable groups and how to make them more secure in one of my previous posts. https://www.welkasworld.com/post/conditional-access-essentials-rmaus-named-locations-authentication-strengths-service-principals#viewer-wds3r4152
Pro tip: Even if your group isn’t intended for a role, consider making it role-assignable for the extra protection.
Key points about PIM for Groups
Groups in PIM cannot have nested role-assignable groups (active membership only).
Group membership activation can trigger app provisioning via SCIM (System for Cross-domain Identity Management - open standard/ protocol for automatically managing user identities in cloud apps), usually in 2–10 minutes. Throttling applies: 5 requests per 10 seconds per enterprise app.
How to apply Just-in-Time access to Purview and other RBAC roles
The process of enabling Just-in-Time (JIT) access for Microsoft Purview and other RBAC roles involves using Microsoft Entra ID Privileged Identity Management (PIM) for Groups. Below are the exact steps to configure it - both through the portal (GUI) and PowerShell.
Step 1: Create a Microsoft Entra ID Group
In the Microsoft Entra admin center (entra.microsoft.com), go to Microsoft Entra ID > Groups > New group.
Select Security or Microsoft 365 Group.
Name the group (for example, Purview PIM).
Under Microsoft Entra roles can be assigned to the group, set this to Yes.
Don’t add members or owners yet > this will ensure users only gain access through PIM activation.
Save the group.

💡 The order of the configuration doesn’t matter much after this, but it’s generally easier to finish setting up everything in Entra ID before switching to Purview or PowerShell.
Step 2: Enable PIM for the Group
Open your newly created group (Purview PIM).
Under the Activity section, select Privileged Identity Management.
Click Enable PIM for this group.

This will allow you to configure the group for eligible membership activation - so users can temporarily elevate their access to any roles the group is assigned.
Step 3: Assign Eligible Users
Now it’s time to define who can activate access through PIM.
In the group’s PIM view, click Assignments > Add assignments.

For Select role, choose Member.
Choose your user (e.g. Azure Admin Adele).

Under Settings, ensure Assignment type is Eligible.
Set start and end dates (maximum duration is one year).
Click Assign.
This configuration allows just-in-time activation for group membership and supports:
Time-bound access (start/end dates)
MFA and approval requirements
Justification for activation
Notifications upon activation or deactivation
Full audit logging of who activated what and when
Step 4: Configure Group Membership Settings
Return to your group’s PIM Settings > Member > Edit.

Adjust the activation requirements as needed:
On activation, require (I would recommend using Microsoft Entra Conditional Access authentication context here, rather than Azure MFA as explained in one of my previous posts: https://www.welkasworld.com/post/conditional-access-essentials-authentication-contexts-secure-pim-resource-access#viewer-qpn0z109989)
Require justification on activation
Enable approval and select approvers

You can also allow permanent eligible assignments here - though it’s a good practice to let eligibility expire yearly and review access through Access Reviews.
On the Notifications tab, configure alerts:
Notify when members are made eligible
Notify when members are activated
Notify when eligible members activate roles
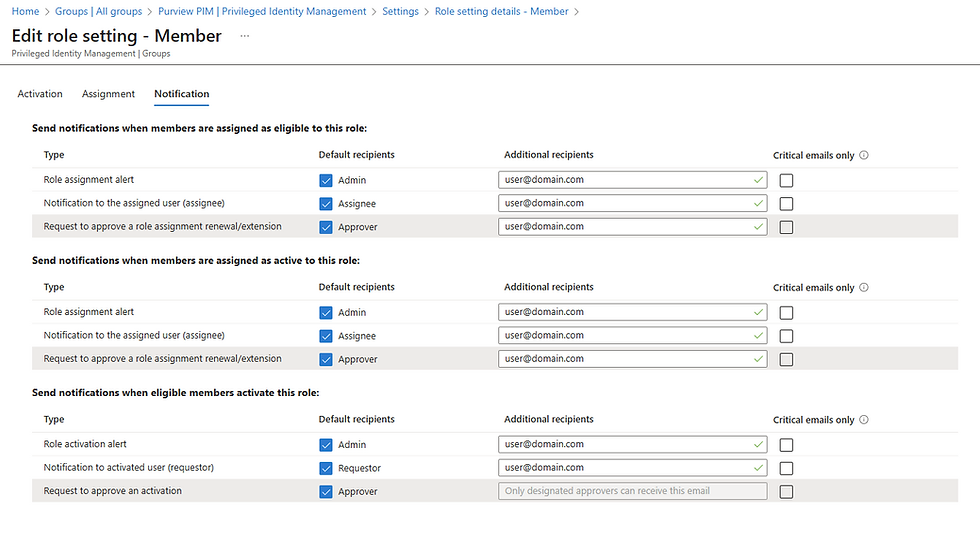
Click Update when done.
Step 5: Assign the Group to Purview Roles
Once the group is ready in Entra ID and PIM, it’s time to map it to Purview role groups. You can do this either through the Purview portal (GUI) or PowerShell.
Option 1 – GUI
Go to purview.microsoft.com > Settings > Roles and scopes > Role groups.
You need Entra ID Global Admin or RBAC Organization Management permission to grant permissions to role groups (also covered in one of my previous posts: https://www.welkasworld.com/post/microsoft-purview-permission-guide#viewer-wx8nt32853)

Identify the roles you want to assign the group to.
In this example:
Content Explorer List Viewer
Insider Risk Management Analysts
Information Protection Analysts
Select each role group, click Edit, then Choose groups.


Search for your Purview PIM group, select it, and click Next > Review > Save.
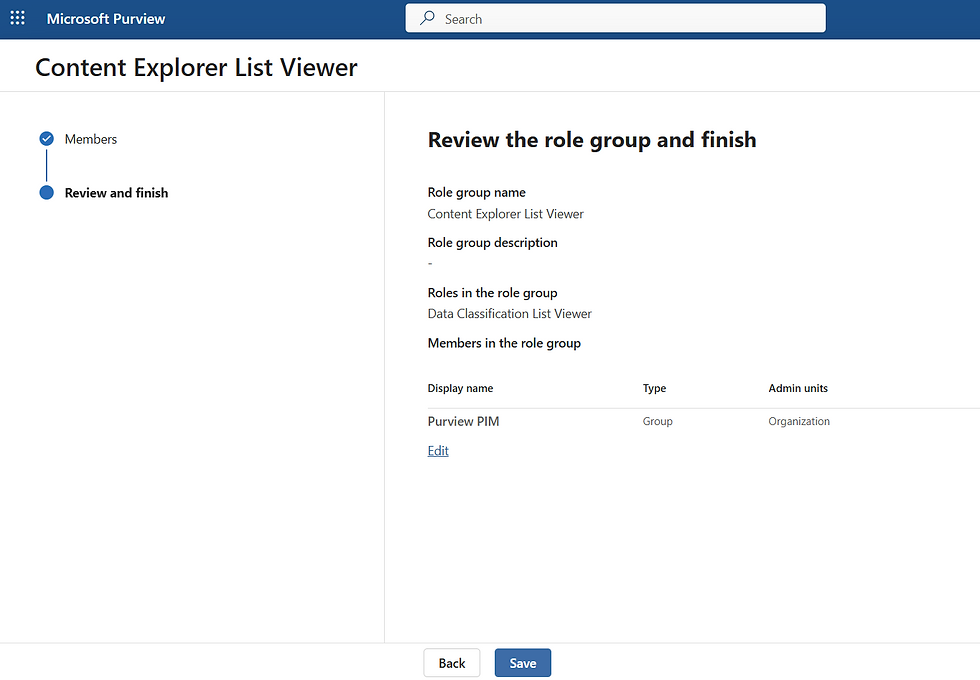
Repeat for each of the role groups above.
⚠️ At the time of writing, eDiscovery Manager and eDiscovery Administrator role groups cannot be assigned to Entra ID groups. All other built-in and custom Purview role groups can be managed using PIM for Groups.
Option 2 – PowerShell
You can also perform the same assignments programmatically. As described above, you will need Global Administrator or Organization Management permissions.
You don’t need to combine role groups - but depending on how granular you want your access model, you can create separate PIM-enabled groups for individual role groups (e.g. "Purview PIM – Content Explorer List Viewer").
User experience: activating access
When a user has eligible membership in a PIM-enabled group:
They go to Microsoft Entra > Privileged Identity Management > My roles > Groups.

Select the group (e.g. Purview PIM).
Choose the activation duration (up to 8 hours, or as defined in your settings).
Provide a justification for activation.

Submit the activation request.
If approval is required, approvers receive an email or portal notification to approve or deny the request, just like the one below.

And when they go to the Azure/ Entra portal to approve it, this is what they see under Groups (not under Microsoft Entra roles).

Once activated, the user (e.g. Azure Admin Adele) temporarily becomes a member of the group and inherits the assigned Purview roles:
Content Explorer List Viewer
Insider Risk Management Analysts
Information Protection Analysts
After the activation period expires, membership and permissions are automatically revoked.
Personally, I like using PIM for Groups because at least you get an audit trail, it allows just-in-time access and an approval process, even if it’s not perfect. Sometimes in security, you go with the lesser evil.
Advantages and Disadvantages of PIM for groups
Using Privileged Identity Management (PIM) for Groups comes with a mix of clear benefits and important caveats. Understanding both sides helps you design a more secure and practical RBAC model for Purview, Exchange, and other roles.
Advantages
Reduces risk of over-permissioned accounts By making users eligible rather than permanently assigned, PIM ensures people only get access when they truly need it, supporting least-privilege access principles.
Group multiple roles for single activation You can assign several role groups to a single PIM-enabled group. When a user activates their membership, they inherit all roles in one go. This saves time, reduces administrative overhead, and simplifies role management.
Approval process for activation
PIM allows you to require approvals before users can activate their membership. This gives you an extra layer of control and ensures that role activations are intentional and reviewed.
Notifications for assignments and activations Admins can receive alerts when users are assigned as eligible, when they activate a role, or when their activation expires. This provides an audit trail, making it easier to track access over time and supports compliance reporting.
Works for Purview and other RBAC roles PIM for Groups isn’t limited to Entra roles as it also works with Purview, and other RBAC-managed systems, giving you a single mechanism for JIT access across multiple platforms.
Disadvantages
PIM downtime = no access when needed If PIM is temporarily unavailable, users cannot activate their roles. This can block critical tasks if the activation is time-sensitive.
Latency issues Sometimes activated roles don’t propagate immediately. Activation provisioning usually takes 2–10 minutes, but high load can throttle requests.
Tips to speed things up:
Visit https://aka.ms/pim/tokenrefresh to refresh your token.
Press F5 or refresh the browser.
Clear cookies and sign out/sign back in.
Wait a few minutes for provisioning cycles to complete.
Not all roles support PIM for Groups Some roles, such as eDiscovery Administrator and eDiscovery Manager, cannot be assigned to groups for PIM activation. Always verify the roles before planning your group assignments.
Avoid highly privileged roles in PIM-enabled groups PIM-enabled groups do not enforce all protections that individual privileged roles normally provide. For example:
If a user is directly assigned Global Administrator, their password can only be reset by a higher privileged role.
If the Global Administrator role is assigned via a PIM-enabled group, eligible members bypass those protections - a lower privileged user could potentially reset the password, creating an elevation-of-privilege risk.
Recommendation: Never assign highly privileged or otherwise sensitive roles (Global Admin, Privileged Role Admin, etc.) to PIM-enabled groups. Only use PIM groups for roles where the risk of bypassing protections is minimal.
Troubleshooting tips / practical caveats
If users don’t get permissions immediately after activation, try:
Refreshing the browser (F5), clearing cookies, or signing out/in
Waiting a few minutes for provisioning cycles (2–10 min under normal load; heavy load may throttle requests)
If a group doesn’t appear in a portal, check:
Group type (Security vs Microsoft 365)
On-premises sync status
Role-assignable status
Licensing requirements
Use PowerShell as a fallback - some role groups are only reliably manageable programmatically.
Never use PIM-enabled groups for highly privileged roles - the protections normally applied to direct role assignments are bypassed, creating potential security risks.
Conclusion
Using PIM with RBAC roles is a great way to give just-in-time access to Purview, Exchange, and more.
Key takeaways:
Group multiple role groups for easy activation
Assign users as eligible, not permanent members
Be mindful of latency, limitations, and roles that can’t use PIM
Sometimes, you pick the lesser evil: PIM for Groups isn’t perfect, but it’s better than permanent access
At the end of the day, PIM helps you manage access responsibly while keeping audit trails. Not flawless, but definitely worth using.


Have you really tested the PIM Security group with Purview ? We tested it and we have remove it because it's take longer to activate and it's documented by Microsoft (Learn about the Microsoft Purview portal | Microsoft Learn). It can take up to 2 hours and for a SecOps teams it's not acceptable. If I need a least privilege role and created a custom role in Purview, I need to assign it directly. PIM Security Group was not good with Purview Role if a Entra Role was not possible.
Agreed, please remove reference to Exchange Online, it requires mail-enabled security groups, which are not supported by PIM.
Regarding the pro tip "Even if your group isn’t intended for a role, consider making it role-assignable for the extra protection," isn't this going to backfire when you reach the 500 role-assignable group limit for a tenant? Where I work, we have many MSPS working on different sections, and we are particularly careful about which groups we make role-assignable to ensure we don't hit the upper limit.
Excellent article. Worth pointing out that you cannot use Entra Security groups in Exchange RBAC roles. The group will need to be mail-enabled to use in Exchange RBAC.