
Conditional Access Essentials: RMAUs, Named Locations, Authentication Strengths, Service Principals
- Aug 26, 2025
- 15 min read

Introduction
This is part 3 of the series, and we’re getting practical. Today we’ll cover four building blocks that quietly make or break your Conditional Access (CA) design. We’ll keep it plain-speaking and real-world. Think of this as your “don’t-get-caught-out” guide: the guard rails, switches and scaffolding that keep CA honest in production.
Table of contents
Conditional Access Essentials
Conditional Access in Microsoft Entra ID is a bit like the traffic control system for your organisation’s apps and resources. It’s a powerful engine that decides who gets access to what, when, and from where. It’s not just about blocking or allowing sign-ins, it integrates with other Microsoft security tools and services, giving you a lot of flexibility to enforce policies that match your security posture and Zero Trust principles.
There are tons of functionalities and integration options, which can feel a bit overwhelming at first. But at its core, Conditional Access is about controlling access intelligently and safely, making sure the right people can get to the right resources without leaving any doors wide open.
In this post, I’m going to focus on a few key pieces that I find essential for building a strong, practical Conditional Access setup (there's more coming over the next few weeks):
Restricted Management Administrative Units (RMAUs) - control who can manage sensitive objects and accounts. I’m including RMAUs in this series because they can be used to protect your Conditional Access personas.
Named Locations - define trusted networks or regions for sign-ins.
Authentication Strengths - enforce the level and type of MFA your users must use.
Service Principals - manage Conditional Access for applications and automated services.
Each of these components plays a critical role in making your Conditional Access policies robust, auditable, and aligned with best practices.
Restricted Management Administrative Units (RMAUs)
RMAUs let you ring-fence especially sensitive objects -> think your CEO’s account, exec laptops, or the security groups that gate your crown-jewel apps, so that only a hand-picked set of admins can change them.
Why this matters for Conditional Access (CA)?
CA is only as strong as the objects it relies on. If anyone can reset your CEO’s password, add themselves to a “VIP exempt” group, or tweak a group that drives a policy scope, your CA house has a back door. RMAUs stop that:
Protect break-glass and policy-scoping groups from casual edits.
Shield exec accounts so for example Level 1 Helpdesk Admins can’t reset their passwords or pull BitLocker keys.
Enforce geo-admin boundaries, e.g., “Only UK-based admins can manage these resources.”
Real-life example
You’ve got a group called “CA-EmergencyAccess” to avoid getting locked out of your tenant. Without RMAUs, a well-meaning admin could add themselves during a late-night incident and forget to remove it. With RMAUs, you can further restrict access to changing the properties and memberships of that group.
Gotchas
The restricted flag is set at AU creation and can’t be changed later. Plan the scope up front.
Objects in an RMAU can’t be managed by some Entra ID Governance features (PIM, Entitlement management, Lifecycle workflows, Access reviews).
Role-assignable groups in an RMAU can’t have membership modified by owners; only specific tenant-level roles can, and those roles aren’t AU-scoped.
Some actions simply aren’t possible at AU scope (e.g., resetting a Global Administrator’s password). You may need to temporarily remove that GA from the RMAU to perform certain operations.
Deletion delay: removing an RMAU can take up to ~30 minutes to fully strip protections.
Scale: max 100 RMAUs per tenant today.
Design tip
Put any group that meaningfully changes CA blast radius (exclusions, admin tiers, privileged app access) into an RMAU. Your future self will thank you.
Personally, for the CA-EmergencyAccess persona, I usually like using both role-assignable group (with no roles actually assigned) and a RMAU. When used together, role-assignable groups and RMAUs make a very strong control: for example, they effectively prevent group deletion since Global Administrator or Privileged Role Admin cannot be scoped to an RMAU, and even a Group Admin at that scope can’t add a group owner. Similarly, an RMAU can lock group properties, and marking the group as role-assignable ensures roles like Directory.ReadWrite.All on a service principal can’t tamper with it. Role-assignable groups also enforce assigned membership, and that protection flag can only be set at creation time. To be clear though, I always recommend assigning the Global Administrator role directly to the break-glass accounts, not through the group, the group setup is just about adding another safeguard.
For anyone considering whether or not to manage emergency access accounts through groups and whether to use role-assignable group and/or RMAU for it, Jay Kerai has a great article on it, that shows you the other angle (that's different than mine), so you can make a more informed decision. https://www.linkedin.com/pulse/main-reason-you-shouldnt-exclude-break-glass-group-access-kerai-4dtve
Alright, now that we've covered RMAU in theory, let's jump into the Entra portal and set up the RMAU for my CA-EmergencyAccess persona.
Hands-on
To safeguard your emergency access (break-glass) accounts or group from accidental changes or even deletion, you can place them in a Restricted Management Administrative Unit (RMAU) without giving that AU any roles. If you ever do need to make changes, such as updating the account’s details or resetting its password or changing the properties and memberships of that group, a Global Administrator or Privileged Role Administrator can simply take the account out of the RMAU, carry out the update, and then put it straight back in. Every step of that process is auditable, so you’ve got a clear record for security and compliance.
Step-by-step (Entra admin centre)
Create the RMAU
Go to Microsoft Entra admin centre > Entra ID> Roles & admins > Admin units > Add.

Name: RMAU-CA-EmergencyAccess (or your naming standard).
Tick: Restrict management (this must be set now; you can’t flip it later).

When ready, click on Review + create
Add the group to the RMAU In Microsoft Entra ID, you can place users, groups, or devices into an Administrative Unit (AU) to narrow down the scope of role permissions. When you assign a group to an AU, only the group object itself is managed within that scope, the individual members of the group are not automatically included.
By the way, to avoid any confusion, the figure below shows my recommended setup for the CA-EmergencyAccess group. In my previous post, the example was only meant to demonstrate how to assign specific roles to a group.

Open RMAU-CA-EmergencyAccess > Groups > Add > select the CA-EmergencyAccess group


Test the control
Sign in as with a different role other than a Global Admin or Privileged Role Admin. Try to make changes to the CA-EmergencyAccess. It should fail.
Sign in as whoever has got the Global Admin or Privileged Role Admin permission to and add/remove a member from the group. It should succeed.
Check Audit logs for the AU and Group to confirm the right events are generated.
Note: Membership changes on a role-assignable group inside an RMAU can only be performed by tenant-scoped Global Admins or Privileged Role Admins (not AU-scoped).
Troubleshooting tips/ FAQ
“A user still can’t edit the group.” Double-check the have the tenant-scoped (not restricted to any Administrative Unit) Global Admin or Privileged Role Admin assigned and active. Changes can take a minute to show.
“We accidentally created the AU without Restrict management.” You’ll need to recreate the AU with the 'Restricted management administrative unit' option set to Yes, it’s immutable.
***
Named Locations
Named locations are friendly labels for IP ranges or countries/regions (based on public IP). You then include or exclude these in CA policies.
Why this matters for Conditional Access?
Location is a powerful context signal. Used well, it reduces attack surface and user friction:
Admins from VPN only: “Admin roles can only sign in from our corporate VPN public IPs or Global Secure Access egress.”
Service accounts locked to servers: “Service principals/users tagged as ‘service’ can only sign in from our known data centre IPs.”
Geoblocking: “Block everything except UK+IE” (allow-list) or “Block these specific countries” (block-list).
Travel exceptions: Temporarily exclude a user who’s travelling so they’re not bricked by stricter rules.
Real-life example
You have a very sensitive application that you only want your end users to access from within your office. Or maybe you want to block sign-ins from countries outside the regions where your organisation operates. In that case, you can create named locations and use them in your Conditional Access policies.
Gotchas
IP drift is real. ISPs and cloud NATs change. Keep your IP ranges fresh or automate updates.
Mobile networks can exit in unexpected countries; don’t rely on country alone for admins.
Design tip
Use named locations as a broad brush to narrow the field, then layer device compliance, risk and authentication strength for fine control.
Hands-on
Okay, so I’m going to use the two scenarios I mentioned above:
You have a very sensitive application that you only want your end users to access from within your office.
You want to block sign-ins from countries outside the regions where your organisation operates.
Scenario 1: Restricting access to office IPs
For scenario 1, let’s create a named location with the IP address of our office and then enforce restrictions through Conditional Access.
Navigate to: Entra admin centre > Entra ID > Conditional Access > Named locations > IP ranges location.
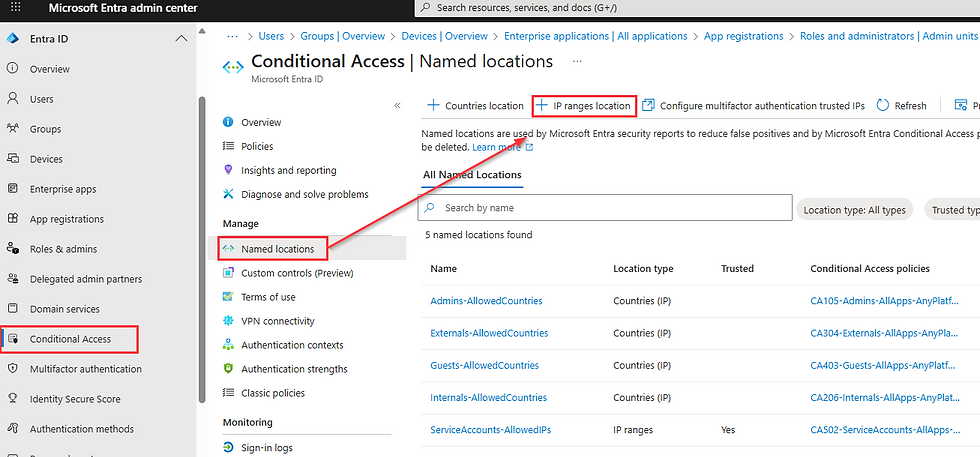
Give the location a name, then click the + button to add your office IP address(es). If you’ve got several, you can upload them in a file instead of adding them one by one.
I like using naming conventions for the things I set up, so I’ve named mine: NL-Global-OfficeIPAddresses but you can go with whatever convention works for you.

Once you’ve added the name and IP address, click Create.
Now let’s create a Conditional Access policy.
For demo purposes, I’m scoping this policy to All users, excluding my break-glass persona. As an example, I’m choosing the Office 365 application (representing the sensitive app in this scenario).
Navigate to: Entra admin centre > Entra ID > Conditional Access > Policies > New policy.

Give the policy a name, then walk through the settings.
Here’s my scenario again:
“You have a very sensitive application that you only want your end users to access from within your office.”
To align with Zero Trust principles, instead of only allowing office IPs, we block everything else. So the aim here is: Block unauthorised access from all non-corporate IP addresses, and allow only the corporate IPs by excluding them from the block.
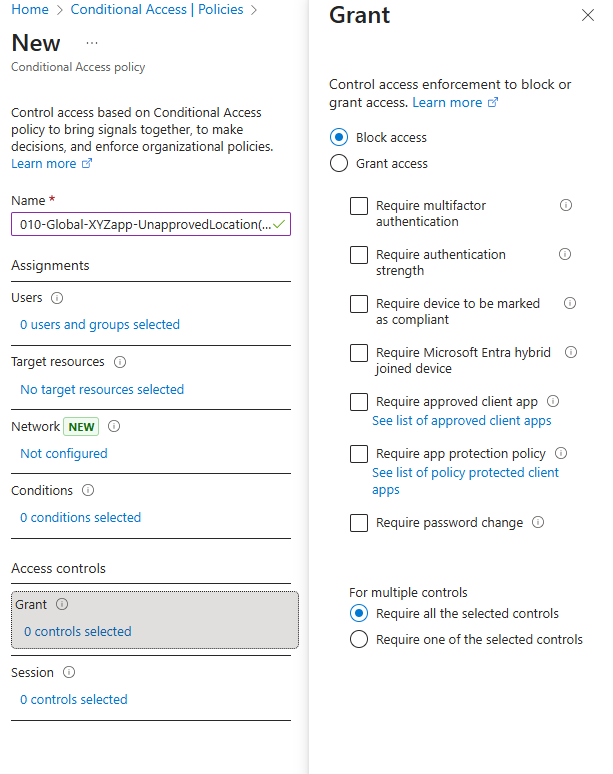
My policy name: 010-Global-XYZapp-UnapprovedLocation(NonOfficeIP)-Block
You can make your naming convention as short or long as you like, but the key thing is: you should be able to tell what the policy does just by looking at the name.
Now, let’s actually unpack what this policy is supposed to do. Sometimes it can be tricky to connect the dots between the name of a policy and the actual configuration, so I like to break the name down piece by piece, starting from the end and working backwards:
Policy Name: 010-Global-XYZapp-UnapprovedLocation(NonOfficeIP)-Block
Block → This is the main purpose: to block unauthorised access.
UnapprovedLocation(NonOfficeIP) → Pretty much what it says on the tin. This means all locations except my trusted Office IP.
XYZapp → This is the application that’s in scope for this policy.
Global → This is the persona. In this case, “Global” = all users. As a best practice, though, we don’t ever want to risk losing access to our sensitive app, so the break-glass accounts are excluded from the policy.
010 → This is just a reference number to help with quick navigation and organisation inside the portal. It’s not technically important, but it’s useful when you have a lot of policies.
With that breakdown in mind, let’s now configure the policy in the same logical order. Starting with Grant controls:
Our goal is to block unauthorised access, so under Grant controls, the setting should simply be: Block access.
Policy configuration:
Grant controls: set to Block access.
Next, let’s configure the locations for this policy. You can do this either through Network settings or through Conditions settings - both will work. Personally, I’m going to stick with the Network option (but if you prefer Conditions, you’d find it under Conditions > Locations).
Under Network settings, First, set Configure to Yes.
Under Include, keep the default setting of Any network or location. Remember, the goal here is to block all unauthorised access from every location except for my trusted Office IP.

Under Exclude, select Selected networks and locations. Then, click into None under the options, pick the named location we just created, and hit Save.


That takes care of the location settings.
Now, moving on to Target resources: here, I need to specify which application this policy is protecting. For demonstration purposes, I’m choosing Office 365, which in this scenario represents my sensitive app.

Finally, let’s configure the Users scope.
Include = All users.

Excluded users: my CA-EmergencyAccess group (because break-glass accounts need to be left out of Conditional Access enforcement).

Once you’re happy with the setup, click Create. (Tip: I always recommend starting policies in Report-only mode so you can test without locking yourself out.)
And that’s it - your policy is created.
If you go back into the Named locations blade, you’ll now see this policy linked to the location we set up earlier.

Scenario 2: Restricting by country
For scenario 2 (you want to block sign-ins from countries outside the regions where your organisation operates), let’s create a named location for the countries we want to allow sign-ins from.
Navigate to: Entra admin centre > Conditional Access > Named locations > Countries location.

Give your location a name, then choose how you want to determine country:
By IP addresses (IPv4 and IPv6), or
By GPS coordinates.
I’ll use IP addresses, and select Ireland and United Kingdom (the only two countries where my imaginary company operates).

Click Save.
Now let’s create the policy.
Policy name: 011-Global-AllApps-UnapprovedLocation-Block
(If you want, you can make the exclusions explicit, e.g. 011-Global-AllApps-UnapprovedLocation(ExcUK+IE)-Block)
Breaking down the name:
Block → Grant control = block unauthorised access.
UnapprovedLocation → Include = Any location, Exclude = UK + IE (my named location).
AllApps → Target resources = All apps.
Global → All users (this time I’m not excluding break-glass accounts).
011 → Policy reference number.
Policy configuration (same order as before):
Grant controls: set to Block access.

Locations:
Include = Any location.

Exclude = My UK+IE named location.

Target resources: All apps.

Users: All users (no exclusions this time).

Click Create (again, recommend starting in Report-only).
And that’s our second policy ready.
You can apply the same principle to other policies as well.
Depending on how much appetite you have for granularity, you could, for example, create different named locations for different personas - just like in the image below.

***
Authentication Strengths
Instead of “MFA is MFA”, authentication strengths let you define which MFA methods are acceptable for a policy.
Not all MFA is created equal. Some legacy methods, like SMS or voice calls, are notoriously easy to bypass or spoof, and really shouldn’t be relied on anymore for sensitive accounts. At the same time, “require phishing-resistant authentication” sounds simple on paper, but in practice it can be tricky. Many organisations, think non-profits, healthcare providers, or educational institutions, face real-world constraints: tight budgets, employees might not have corporate phones, may be uncomfortable using personal devices for MFA, or could be working on the road with outdated devices that don’t support Windows Hello for Business. This is why it’s usually smarter not to just tick the generic Require MFA box in Conditional Access. That setting would accept any form of MFA, legacy or modern, safe or sketchy, without distinction. Instead, Conditional Access lets you enforce different types of authentication for different personas, ensuring that the right level of security is applied to the right users and apps. That’s exactly what Authentication Strengths are for, you can use built-in strengths or create custom ones tailored specifically to your organisation’s needs.
Why this matters for Conditional Access?
Attackers have upgraded. Push fatigue and SMS are easier to phish than cryptographic methods. With strengths you can say:
For standard apps: any modern MFA is fine.
For sensitive data: only phishing-resistant methods.
For admins: require FIDO2 keys
For frontline workers: SMS
Real-life examples
Privileged access: “All administrator roles must use Passkeys (FIDO2).”
Highly sensitive app: “Require Phishing-resistant MFA or CBA; block older MFA.”
Migration path: Start with Modern MFA for staff, then move finance/legal to phishing-resistant as hardware keys or WHfB adoption grows.
Patterns that work
Tiered strengths
Baseline workforce: Modern MFA.
High-value users/apps: Phishing-resistant MFA.
Break-glass: FIDO2 keys.
Gotchas
Registration and interrupts: Some passkey scenarios don’t play nicely with MFA registration campaigns or SSPR interrupts. If you rely on Temporary Access Pass (TAP) during rollout, be deliberate: TAP is powerful, treat it like a short-lived skeleton key.
User comms and hardware: If you mandate FIDO2/WHfB, make sure the hardware and help guides land before you flip the switch.
Design tip
Write down a matrix: user tiers × app sensitivity × required strength. It keeps you honest when exceptions start knocking.
There’s a lot of noise online at the moment about an emerging threat where attackers can allegedly downgrade authentication methods to weaker ones (for example, downgrading FIDO2 to a push notification in the Authenticator app), thereby increasing the risk of Man-in-the-Middle (MiTM) attacks. This is simply not true and it’s not possible if you enforce authentication strengths within Conditional Access. This is yet another reason to start using them in your policies.
Let's jump into the Entra portal to explore the Authentication strengths options and see how to set them up.
Navigate to the Entra admin centre > Entra ID > Authentication methods > Authentication strengths In the image below, you can see both the built-in authentication strengths and a few custom ones I’ve created.

The table below shows which authentication methods are supported by each built-in authentication strength:
Authentication strength name | Multifactor authentication | Passwordless MFA | Phishing-resistant MFA |
Authentication methods supported | Windows Hello For Business / Platform Credential OR Passkeys (FIDO2) OR Certificate-based Authentication (Multifactor) OR Microsoft Authenticator (Phone Sign-in) OR Temporary Access Pass (One-time use) OR Temporary Access Pass (Multi-use) OR Password + Microsoft Authenticator (Push Notification) OR Password + Software OATH token OR Password + Hardware OATH token OR Password + SMS OR Password + Voice OR Federated Multifactor OR Federated Single factor + Microsoft Authenticator (Push Notification) OR Federated Single factor + Software OATH token OR Federated Single factor + Hardware OATH token OR Federated Single factor + SMS OR Federated Single factor + Voice | Windows Hello For Business / Platform Credential OR Passkeys (FIDO2) OR Certificate-based Authentication (Multifactor) OR Microsoft Authenticator (Phone Sign-in) | Windows Hello For Business / Platform Credential OR Passkeys (FIDO2) OR Certificate-based Authentication (Multifactor) |
Creating a custom authentication strength
Once you're in the Entra portal, navigate to Authentication methods > Authentication strengths > New authentication strength

Fill out the name and description. I'm naming mine 'ModernMFA'
Select the MFA methods you want this strength to support. In my case, I’m choosing: Windows Hello for Business (WHfB), Passkeys, certificate-based authentication, Microsoft Authenticator (Phone Sign-in), Temporary Access Pass (TAP) (One-time use and Multi-use) and Password + Microsoft Authenticator (Push Notification).
Once you're ready click Next, and then Create.


Enforcing authentication strengths in a Conditional Access policy
A custom authentication strength doesn’t do anything on its own—you need to enforce it through a Conditional Access policy.
Navigate to the Entra portal > Conditional Access > Policies > New policy
Give your policy a name, in my case I am calling it '000-Global-AllUsers-AllApps-EnforceModernMFA'
Specify the users you are targeting, in my case All users are included and my service accounts under the CA-ServiceAccounts persona are excluded
Fill out your target resources, for me it is All resources (formerly 'All cloud apps') without any exclusions.

Next go to the grant controls, check the option against 'Require authentication strength' and from the drop down menu select the authentication strength you want to choose, in my case it is the 'ModernMFA' one. Click Select.

Create your policy. As always, I recommend starting with a report-only mode first.
⚠️ Important note: If you enforce a specific authentication strength and a user doesn’t have a supported method already registered and active, they will be locked out.
Example: My user Adele has only set up SMS and Microsoft Authenticator push notifications. If I enforce a policy requiring Passkeys (via FIDO2 keys or the Authenticator App), Adele won’t be able to sign in as she doesn’t have a passkey registered. The result? She’s locked out until someone excludes her from the policy.
***
Service Principals
Service principals (SPs) are the application identities in Entra ID. CA can target apps, but not every SP you care about shows up by default.
Why this matters for Conditional Access?
You might want to apply CA to things like Intune Enrolment or invitation portals, only to find they’re missing from your app picker. Reasons include:
Tenant age (older tenants have some SPs pre-baked, newer ones don’t).
The app hasn’t been used yet (SP not created).
The SP is “hidden” and must be manually registered.
Real-life examples
You may want to target a specific application within your Conditional Access policy, but the application isn’t listed under Target resources (unlike other built-in apps that appear there with their associated App IDs, as shown in the image below).

In this case, one of the reasons why your application is not listed there is the fact your app does not have a service principal. Below are the steps to quickly create a service principal for your application.
How to add a missing service principal
If an app is eligible, you can create its SP with Microsoft Graph:
Once it exists, you’ll be able to target it in CA (subject to the usual app selection behaviour).
Real-life example
You’re tightening device onboarding. You register the Microsoft Intune Enrollment SP, then create a CA policy that allows enrolment only from compliant named locations and requires phishing-resistant auth. Suddenly, rogue enrolments from unexpected networks stop being a thing.
Gotchas
Microsoft-curated app bundles (e.g., Office 365) include lots of dependencies and are tested together. When you start targeting individual SPs that weren’t in the default list, you can create odd side effects.
Test in a lab or a tightly scoped pilot first, and always keep a break-glass route.
***
Conclusion
RMAUs, Named Locations, Authentication Strengths, and Service Principals are the quiet operators behind a solid Conditional Access design:
RMAUs protect the objects your policies depend on.
Named Locations narrow the playing field before finer checks kick in.
Authentication Strengths raise the bar against modern phishing and AiTM.
Service Principals make sure the right application identities are actually in scope.
If you’re iterating your CA right now, try this:
List the groups and accounts that could weaken or bypass CA if misused → move them into RMAUs.
Define named locations for corp egress, VPN, and any trusted SaaS egress; review monthly.
Map strengths to tiers (workforce, sensitive, admin) and start migrating the sensitive tier to phishing-resistant authentication.
Inventory app targets, add missing service principals where needed, and pilot before broad rollout.
Stay tuned for more insights.
Comments