
Conditional Access Essentials: Managing Exclusions with Identity Governance and Temporary Access Pass
- Sep 9, 2025
- 9 min read

Introduction
Welcome back to another post in my series on conditional access essentials.
By now, if you’ve been following along, you probably feel like you’re in a good place. You’ve set up some conditional access policies, maybe tested them out, and you’re confident you could roll them into a production tenant. First of all - well done. But also… let’s not get too comfortable.
Here’s the reality: conditional access is powerful, but sooner or later you’re going to bump into real-world problems that theory doesn’t prepare you for.
Think about it:
You’ve just switched on MFA for everyone - how do you onboard new users without locking them out before they even start?
One of your employees loses their phone and suddenly can’t use Authenticator - what then?
Your organisation blocks sign-ins from certain countries - but what happens when someone has to travel there for work?
These are the kinds of challenges that can trip up even seasoned IT pros. That’s why today we’re going to look at how to manage exclusions in a smart way, without leaving big security holes.
Specifically, we’ll cover two tools in Microsoft Entra that can make life easier:
Temporary Access Pass (TAP): a secure way to onboard and recover users.
Identity Governance (Access Packages): a structured way to manage exceptions like travel access.
Let’s break it down.
Table of Contents
Temporary Access Pass (TAP)
A Temporary Access Pass (TAP) is a time-limited code that allows a user to sign in when they don’t yet have a secure authentication method set up - or when they’ve lost access to one.
Think of it like a temporary door key:
You can set it to expire after a certain time.
It can be single-use or multi-use.
It always satisfies a Conditional Access requirement for MFA (including 'Modern MFA')
It’s randomly generated and can never be retrieved once created.
So why is this useful? Because it avoids the classic “MFA chicken and egg” problem.
Without TAP, you often end up in a loop:
The user logs in for the first time.
Conditional Access demands MFA.
But they don’t have MFA set up yet… so they’re stuck.
With TAP, an admin can give them a short-lived passcode. They log in, register their proper authentication methods (Authenticator, passkey, FIDO2, etc.), and carry on.
It’s equally useful when a user loses their phone - instead of messing around with endless resets, you just issue a TAP, and they’re back in business.
Why TAP matters for conditional access?
Let’s look at a real-world scenario.
Devices may be provisioned with Autopilot at your organisation.
Conditional Access requires:
MFA for all apps.
MFA to register security information.
A compliant (corporate) device to register security information.
Result? Deadlock. The user can’t log in without MFA, but they can’t set up MFA without logging in. And device compliance may not even kick in during the initial setup process.
TAP solves this:
The admin issues a TAP.
The user signs in smoothly, because TAP counts as MFA.
They go to aka.ms/mysecurityinfo and add proper sign-in methods.
When the TAP expires, they use their registered strong authentication going forward.
Recommendation:
Use TAPs to bootstrap new users and handle recovery. They protect registration flows without endless admin intervention.
NOTE: If you’re using interrupt mode for MFA or Self-Service Password Reset, these aren’t yet compatible with registering passkeys (FIDO2). That means users might need to go through two steps: first complete the interrupt mode setup, then manually register their passkey before the TAP expires.
Reference: https://learn.microsoft.com/en-us/entra/identity/authentication/concept-registration-mfa-sspr-combined
TIP: Provide your users with clear documentation and step-by-step guides for registering security information. It’ll save you a lot of support tickets.
How to configure and issue TAPs
Enable TAP in Entra
Sign in to the Microsoft Entra admin centre as an Authentication Policy Administrator (or higher).
Go to Entra ID > Authentication methods > Policies.
Select Temporary Access Pass from the list.

Click Enable, then choose which users or groups you want to include.

(Optional) Configure settings such as lifetime, length, or start time.

Save.
NOTE: Only users covered by this policy can sign in with a TAP.
Create a TAP for a User
Once enabled, you can generate a TAP for an individual user:
Sign in as an Authentication Administrator.
Navigate to Entra ID > Users, and select the user.

Open Authentication methods > Add authentication method.

Select Temporary Access Pass.

Configure duration and activation time.

Save.
Important: You’ll only see the TAP value once. Make a note of it and pass it securely to the user.

Use a TAP
The user goes to aka.ms/mysecurityinfo.
They enter their UPN (e.g. user@contoso.com).
If they’re in the TAP policy, they’ll be prompted to enter their TAP.

Once signed in, they can register MFA methods and delete the TAP.

That’s the TAP lifecycle in a nutshell.
Make sure to check official Microsoft documentation on TAP here: https://learn.microsoft.com/en-us/entra/identity/authentication/howto-authentication-temporary-access-pass
***
Identity Governance
Identity Governance in Microsoft Entra ID is all about making sure the right people have the right access to the right resources, and only for as long as they actually need it.
This isn’t just about tightening security; it’s also about reducing admin overhead and giving users a smooth, self-service experience. Identity Governance is built around a few key capabilities:
Access Reviews - regularly check if people still need access.
Entitlement Management - automate and streamline access requests, approvals, and lifecycle.
Privileged Identity Management (PIM) - control and monitor privileged accounts. (To see how you can use conditional access to require reauthentication every time that someone activates a PIM role check out this post.)
Let’s break these down further.
Entitlement Management
At its core, Entitlement Management is about managing access at scale. Instead of IT manually granting (and forgetting to revoke) permissions, you can:
Automate access requests and approval workflows
Define who can request access and under what conditions
Set expiry dates so temporary access doesn’t linger
Run periodic reviews to confirm ongoing need
Cover both internal users and external collaborators (like vendors or partners).
Think of it like a self-service access shop with built-in guardrails. Users can request access to apps, Teams, groups, or SharePoint sites, and Entra handles the workflows automatically in the background.
Some real-world examples of why this matters:
A travelling employee can request temporary access to log in from a blocked country.
A contractor can get into a specific Team for the duration of a project.
An auditor can request read-only access to sensitive reports, which is then automatically revoked when their review ends.
The key benefit is lifecycle automation - onboarding, access changes, and offboarding - without IT constantly in the loop, but still with complete visibility and control.
Access Packages
Now that you understand Entitlement Management, Access Packages will make a lot more sense. These are the building blocks that live inside Entitlement Management. You create Access Packages to bundle together apps, groups, and resources, and then publish them for users to request.
They can include:
Group or Team membership
Applications (SaaS or custom apps)
SharePoint sites
Even Microsoft 365 licences (via group-based licensing).
Instead of IT manually adding people to each of these, the user requests the package, approvals happen (if required), and it’s all automated.
So what does this have to do with conditional access exclusions?
You can build Access Packages that temporarily put a user into a group which is excluded from a specific CA policy. For example:
Normally, you block logins from outside your home country.
But you create a “Travel” Access Package that adds the user to a group excluded from that geographic block.
When they come home, the package expires, and the exclusion is automatically removed.
It’s neat, self-service, and doesn’t leave permanent holes in your policies.
Example scenario: secure travel access
Let’s make it concrete.
In a previous post, I showed how to block access from unauthorised locations. Let’s reuse that scenario.
Imagine Adele, one of our users, has a business trip to France. Normally, we block France since our company doesn’t have an office there. But now she needs full access to Microsoft 365 apps while travelling.
Here’s what we do:
Create a sub-persona group, e.g. CA-Internals-Travel. Blog post covering the creation of personas can be found here. Example:

Create a named location, e.g. Internals-Travel-ApprovedCountries. Blog post covering the creation of named locations can be found here. Example:

Build a conditional access policy that only applies to CA-Internals-Travel persona, with geo restrictions scoped to the new named location. Personally, I prefer the block approach, even though you have more flexibility using grant controls.
In this example, the policy will:
Block access to all apps for the CA-Internals-Travel persona
From all locations
Except for the named location “Internals-Travel-ApprovedCountries”, which includes France. Config details below:


Exclude the CA-Internals-Travel persona from your conditional access policy that blocks access from an unauthorised countries (my policy was called 011-Global-AllApps-UnapprovedLocation-Block). The configuration details are shown below and are also covered earlier in this post.


Set up an Access Package that Adele can request, which temporarily puts her in CA-Internals-Travel.
This way:
Adele can work securely in France.
IT doesn’t have to fiddle with policies every time someone travels.
Exclusions are temporary, tracked, and reviewed.
Creating an access package
Step 1: Start the creation process
Sign in to the Microsoft Entra admin centre as at least an Identity Governance Administrator.
Go to Identity Governance > Entitlement management > Access packages.
Select + New access package.

Step 2: Configure basics
On the Basics tab:
Give your access package a name and description.
Users will see this when they request access, so make it clear and meaningful.

Select the catalog where this package should live.
Example: You might have a Sales catalog managed by a catalog owner who looks after sales resources.
NOTE: If you don’t see a suitable catalog and you have the right permissions, you can create a new one on the fly. The package and its resources will then live in that catalog.
Step 3: Add resource roles
Now decide which resources the package should provide access to:
Choose a resource type: Groups and Teams, Applications, or SharePoint sites.

Pick the specific resources.
If you’re an Identity Governance Admin or catalog owner, you can also add resources that aren’t yet in the catalog (these get added automatically). In my case, my resource role is going to be a member of the CA-Internals-Travel group (persona)

Select the role users should get for each resource (e.g., group member, application user). In my example, it’s member. In other words, when a user logs their travel request via this access package, once approved, they’ll be added to the CA-Internals-Travel persona. As a result, they’ll be excluded from the standard unauthorised policy and instead fall under a different Conditional Access policy that allows travel to approved countries.

For groups managed by PIM, both active and eligible roles will be available.
Step 4: Create the initial request policy
Policies define who can request the package and how approvals work. On the Requests tab:
Decide if the package can be requested by:
Specific users or groups
All members (excluding guests)
All users (including guests)
If you’re allowing guest users (via Entra B2B), they’ll be included only if you choose the “All users (including guests)” option.
Next, set your approval settings:
You can require approval from a manager, an admin, or skip approval for automatic assignments.
Start simple - you can always add more request policies later. Example:


Step 5: Requestor information
Specify which questions you’d like users to answer when they submit an access package request (e.g., travel dates, destination country, business justification).

Step 6: Lifecycle settings
Define how long the assignment lasts, when it should expire, and whether users need to re-request access.

Step 7: (Optional) configure custom extensions.
Note that this feature requires the Microsoft Entra ID Governance subscription

Step 8: Review and create
Double-check all your settings, then hit Create.

The end user and approver experience with access packages
So far, we’ve looked at how to create and configure access packages. But what does the process actually look like for an end user (like Adele) and the approver (such as her manager)? Let’s walk through it step by step. End user experience (Adele’s point of view)
At this point, you’re already familiar with myaccount.microsoft.com and mysignins.microsoft.com. Access packages can be reached from there.

However, the recommended portal for users is: myaccess.microsoft.com
Here’s how Adele would request access to her “Travel” package:
Sign in to myaccess.microsoft.com.
In the left menu, select Access packages (or Browse available access packages).

A list of packages available to Adele is displayed.
She finds the “Travel” package and clicks Request.

Adele clicks Continue to move forward.
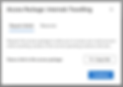
She’s then prompted with the request form that I configured earlier in Entra:
Dates of travel
Country she’s travelling to
Business justification
Adele fills out the details and clicks Submit request.

To track progress, Adele can open the Request history blade, which shows all her current and past requests.

Approver experience (manager’s point of view)
The approver (usually Adele’s manager, or a fallback approver if specified) gets an email notification from: mssecurity-noreply@microsoft.com
That email contains a link to go straight to the approval decision.

Alternatively, the approver can:
Sign in to myaccess.microsoft.com.
Select the Approvals blade on the left.

Review Adele’s request. At this stage, they can:
View full request details
Check the package details
See any previous approval history

The approver chooses Approve or Deny, adds a reason, and clicks Submit.

Once that’s done, Adele’s request status updates immediately.

Notifications and Tracking
End user (Adele):
Can always check Request history to see status.

Receives email updates when her request is approved, when access is about to expire, and when her access finally ends.
Has full visibility into the approval timeline.

Approver (Manager):
Receives notifications for new requests.
Gets updates if any changes are made to a request.

This two-sided flow keeps everything transparent: users know where their request stands, and approvers have a clean, guided workflow for making decisions.
Conclusion
Conditional Access isn’t just about enforcing rules - it’s about finding the balance between strong security and practical usability.
Temporary Access Pass solves onboarding and recovery headaches.
Identity Governance and Access Packages make exceptions manageable, auditable, and temporary.
By combining these, you get a system that’s scalable, user-friendly, and resilient against real-world messiness.
If you want the full Microsoft reference docs, you’ll find them here:
Stay tuned for more content!