
Unraveling the Mysteries of DLP and sensitive info types: A Tech Odyssey
- Jan 25, 2024
- 10 min read
Updated: Nov 3, 2025

Introduction
You know that feeling when you're searching for a recipe online, and you stumble upon a blog where the author insists on sharing their life story before getting to the point? Well, fear not, because this blog is not one of those. We're diving straight into the tech talk, but with a twist. While I'll keep the main point upfront, I understand that not everyone is a tech wizard. So, for those taking the first steps in the IT world, or maybe just dipping their toes, the bottom section of my posts will provide more details. Now, let's cut the fluff and dive into the world of Data Loss Prevention (DLP).
Table of Contents:
1. Understanding DLP
Introduction to DLP
Data Loss Prevention (DLP) is a comprehensive strategy and set of tools designed to protect sensitive and confidential information from being accessed, shared, or leaked inappropriately. The primary goal of DLP is to prevent the accidental or intentional loss of sensitive data, whether it's customer information, financial records, intellectual property, or any other critical data that an organisation needs to safeguard.
The chronicles of custom file tags
In a recent conversation with a customer planning DLP migration from a third-party solution to Microsoft's DLP, key concerns emerged. The customer stores files in different locations (on-premises, user devices, and the cloud), but also classifies data through custom metadata tags in file properties, example illustrated below (Figure 1).

Figure 1 - Example of a metadata tag
The pivotal question arose: would Microsoft's DLP align with their meticulous practices? Mainly, apprehensions surfaced regarding the perceived limitations in conditions for Endpoint DLP compared to the customer's current solution.
2. DLP and the document tag
Document Properties in EXO/SPO/ODfB & On-Prem Repositories
I conducted thorough research and testing to implement DLP policies utilising 'document property' condition across diverse locations, including on-prem repositories, Exchange Online (EXO), SharePoint Online (SPO), and OneDrive for Business (ODfB). Armed with Word documents and Excel spreadsheets adorned with manually added metadata tags, the testing journey revealed promising results. The support for document properties in DLP proved comprehensive, showcasing its effectiveness in on-prem repositories and Microsoft 365 cloud services. Notably, DLP policies successfully recognised and responded to the document tags, demonstrating a seamless integration of document property conditions across these critical data storage environments.
Check out the visual snapshots below (Figure 2 & 3), for a glimpse into the successful testing phase. The examples below show a scenario of having a DLP policy scoped at EXO, SPO & ODfB locations that restricts access for everyone if a file containing an employee number (sensitive info type using a regular expression), is shared internally or externally.

Figure 2 - Example of a DLP email notification

Figure 3 - Example of a DLP policy match in Activity explorer
Endpoint DLP and Document Properties – Expectations vs. Reality
Now, let's shine a spotlight on the intricacies of Endpoint Data Loss Prevention (DLP) and navigate through its capabilities. Endpoint DLP, the vigilant guardian of data on individual devices, holds a crucial role in the broader spectrum of data protection. It allows organisations to extend their security umbrella to cover laptops, desktops, etc., ensuring that sensitive information remains safeguarded even beyond the confines of the corporate network.
The below Figure 4 shows us different conditions that can be applied to data loss prevention policies scoped to devices.

Figure 4 - Conditions available for Endpoint DLP
However, as we delve deeper into the nuances, a notable gap surfaces – the absence of support for the document property condition in Endpoint DLP. This omission raises eyebrows, especially when considering the comprehensive support for document properties in other DLP locations. One would naturally presume that this capability should seamlessly extend to Endpoint DLP, given its importance in holistic data protection.
Why Won't Endpoint DLP Policies recognise Document Properties
The document property condition, plays a pivotal role in classifying and safeguarding sensitive information via DLPs. Yet, when it comes to Endpoint DLP, the lack of support for document properties can be a head-scratcher. In the realm of data protection, where consistency is key, this gap in support is a huge disappointment.
While document properties may not currently find a home in Endpoint DLP's array of conditions, this doesn't spell the end of the road for strategic data protection. It becomes imperative for organisations to acknowledge this limitation and explore alternative avenues. Whether it involves leveraging file extensions or phrases included in the documents’ names (where you can use regular expressions which gives you endless possibilities), or concealing metadata tags within documents, the goal remains the same – to fortify data protection in the face of evolving challenges.
3. Sensitive Info Types and Regex Revelations
Sensitive Info Types Demystified
Sensitive info types typically refer to predefined templates or patterns used to identify and classify sensitive information within documents and data sets. These templates can include various types of sensitive data such as credit card numbers, social security numbers, medical records, or any other information that organisations need to protect.
The Great Regex Experiment: [A-Z]{3}[0-9]{5}
Discovering the absence of support for document properties in Endpoint DLP left me disappointed, prompting a deeper exploration. In response, I conducted further research, realising that if traditional DLP didn't fit the bill, a custom sensitive info type might hold the key. I crafted a custom sensitive info type named "Demo - Employee numbers" using a regular expression ([A-Z]{3}[0-9]{5}) to mirror the format of employee numbers in a hypothetical organisation—three capital letters followed by five numbers, eg. EMP43217.
A regular expression, often abbreviated as "regex" or "regexp," is a sequence of characters that defines a search pattern.
The custom sensitive info type's pattern pictured below in Figure 5.

Figure 5 - Conditions available for Endpoint DLP
The Odd Encounter: Document Properties vs. Sensitive Info Types
Exploring the capabilities of the Compliance Admin Centre revealed a unique aspect regarding the testing of sensitive info types before their integration into Data Loss Prevention (DLP) policies.

In a surprising turn of events, I created a .docx and a .xlsx file with random text, devoid of any employee numbers, yet manually applied metadata tags to serve as a test case. Uploading multiple files for testing left me astonished – each file with the applied tag showed a match during testing.


Given the ambiguity in Microsoft's documentation regarding whether sensitive information types support document properties or headers and footers, I embarked on a firsthand investigation, as there is considerable misleading information circulating online on this matter.
Therefore, after testing in the data classification section of the Compliance Admin Centre, I decided to assess its real-world applicability as a condition in a DLP policy.
Sensitive Info Types - Research and Testing findings
After thorough testing in the research phase on sensitive info types, here are the key findings:
The 'test' function within the data classification settings (MS Purview | Data Classification | Classifiers | Sensitive Info Types | [select your sensitive info type] | test) recognises document properties, the body of the document, and headers and footers for the selected sensitive info type.
Data loss prevention using 'content contains: sensitive info type' shows robust recognition and support for sensitive data within both the body and headers/footers of documents, as verified in tests conducted on Word and Excel files.
However, it's crucial to note that data loss prevention using 'content contains: sensitive info type' does NOT recognise or support metadata tags or any other document property, a noteworthy limitation to consider.
To summarise, the DLP testing revealed that sensitive info type did not support document properties, consequently leading to non-recognition by the DLP system. This finding is particularly surprising given that the portal's sensitive info type testing already demonstrated the recognition of data in file properties, begging the question towards Microsoft: why not extend this capability to DLP policies?
4. Conclusion:
As the DLP adventure concludes, the key takeaway: adaptability is the hero's cape. Document properties hiccup? Fear not! Workarounds abound – file extensions, regex, or metadata hide-and-seek. DLP strategy, meet flexibility.
For examples of test files, detailed test policies, and additional workaround information, please refer to the "Additional Information - Research and Workaround Details" section below for comprehensive insights.
Our journey doesn't end here – it's a dialogue, not a monologue. Share your DLP wisdom! Tips, challenges, or just a friendly chat – let's navigate the data protection landscape together. Drop your thoughts below or reach out directly. The DLP adventure continues!
For more information, check out the bottom section of this post.
5.Additional information
Additional Information - Research and Workaround Details
Congratulations, savvy reader! If you've made it this far, you deserve a virtual high-five or, better yet, a certificate in "Advanced Endurance in Tech Navigations." You're not just an explorer; you're the Indiana Jones of data protection. Now, for the truly curious minds, this next section is where the tech tales get juicier. I'll spill the beans on my testing escapades, share some pearls of wisdom, and throw in a dash of sage advice for those sailing in the same data protection boat. So, buckle up, intrepid ones – the treasure trove of testing intricacies and tech tidbits awaits your eager eyes! 🚀💻✨
Research and testing details
I created a total of eight files: a mix of .docx and .xlsx files that would contain an employee number in either document properties, headers and/or footers, or the body of the file.
I conducted all tests using my test user's (Adele Vance's) account in a demo environment.
The table below (Table 1) outlines the details of each of my test files and where the employee number (our sensitive info type) was located.
File Name | Details where the employee number was |
|---|---|
Demo-Test File 1 - metadata tag present.docx | Employee number in document properties |
Demo-Test File 2 - metadata tag present.docx | Employee number in document properties |
Demo-Test File 3 - metadata tag present.xlsx | Employee number in document properties |
Demo-Test File 4 - metadata tag present.xlsx | Employee number in document properties |
Demo-Test File 4x - metadata tag not present tag in header.xlsx | Employee number in the header |
Demo-Test File 5 - no metadata tag, employee number hidden in the body.docx | Employee number hidden in the body of the document (font changed to white) |
Demo-Test File 6 -2 employee numbers hidden in header and footer | 2 employee numbers hidden in the header and the footer (one each & font changed to white) |
Demo-Test File 7 -metadata tag not present tag in header.xlsx | Employee number in the file's header |
Table 1 - Test File Details
The image below shows my "Demo - Test File 1 - metadata tag present" file. You can see from this picture that there are no headers and no footers, and I only typed 'Test document' in the body of this Word file. There are no hidden phrases here; the number of words visible at the bottom of the page confirms it.

The picture beneath is an example of our metadata tag that I applied manually to my Excel file. It matches the regex criteria of my sensitive info type based on the pattern: [A-Z]{3}[0-9]{5}, so three capital letters followed by five numbers. It does not matter whether this tag gets applied manually or through a Document Management System process or some sort of automation.

Underneath this paragraph, we can find an example of how we may hide, for example, an employee number within either the body or header/footer of a document. We can use something as simple as changing the colour of the font to do that.

I created multiple Data Loss Prevention policies that would either use 'content contains: document property' or 'content contains: sensitive info type' with another condition "Content is shared from Microsoft 365", and in this scenario I used both available options:
detects when content is shared with people outside of the organisation,
and also detects when content is shared with people inside of the organisation.


My EXO/SPO/ODfB policies were scoped to Exchange Online, SharePoint and OneDrive locations only, whereas the Endpoint DLPs were scoped to devices only. I made sure that my test device was successfuly onboarded to Microsoft Purview, and all Endpoint DLP policies were also updated prior to my testing.
For my Endpoint DLPs, I utilised the 'File activities for all apps' and I applied restrictions to specific activities, as pictured below.

I also modified user notifications/ email notifications and policy tips to test the end user experience and verify that actions were being blocked as they should be, and ensure that the user couldn't exfiltrate data containing employee numbers. You can always edit them as you see fit, the below is just an example from one of my policies.

Then I tested it on Adele's (test user's) Entra ID joined machine, which is onboarded to Purview.
You can see the Endpoint DLP notification in the bottom right, in the image underneath, that popped up when my end user was trying to copy a file containing sensitive info to a removable drive (USB in this case).
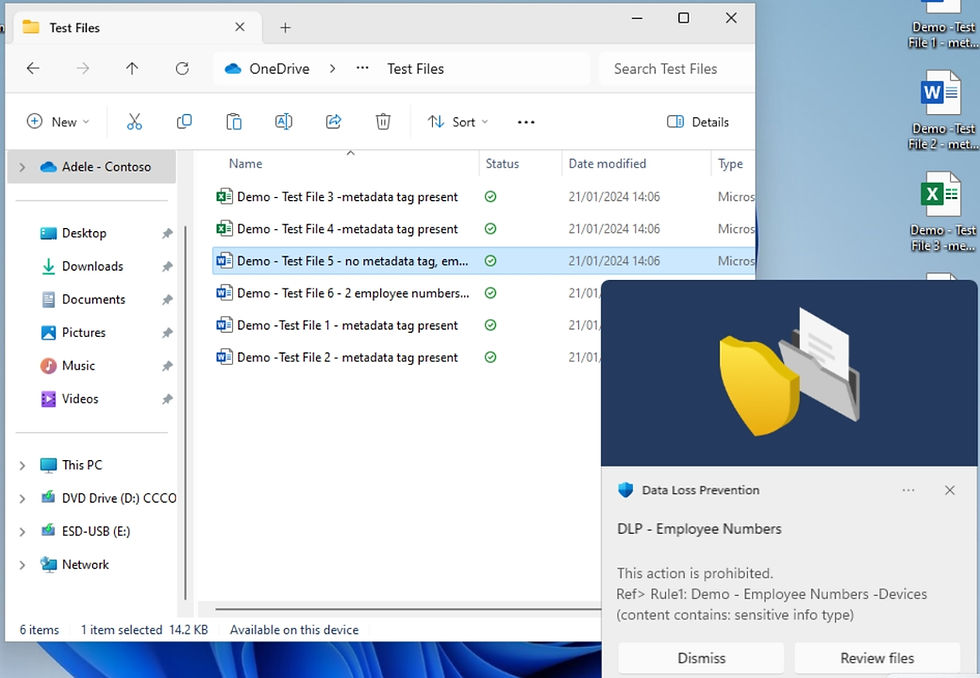
The same pop up appeared for Files 4, 5, 6, 7 when the same activity was being tested.

Moreover, below are also some examples of email notifications you can set up for the user who tried to send, share or last modified the content being exfiltrated. You can also notify additional people (such as your admins) whenever a prohibited activity happens.


In summary, Data Loss Prevention offers a plethora of options to finely tailor your policies. Whether you're curious about my research findings or have questions related to deploying DLP for your organisation, feel free to reach out. My inbox is open, and I welcome any inquiries or requests for more information.
Cannot use document properties in Endpoint DLP? - Workaround details
In the realm of Endpoint DLP, it's admittedly strange and somewhat disappointing that the document property condition is not supported. However, fear not, as there are clever workarounds to ensure your sensitive data stays secure. Consider a scenario where your files contain employee numbers, a critical piece of information that shouldn't fall into the wrong hands. Here are a couple of effective strategies to refine your DLP policies:
Camouflaging Sensitive Content By embedding your sensitive tag or keyword within the document body, using a font color that matches the background (e.g., white), you ensure DLP recognition while making it inconspicuous to the human eye. You can for example apply it to your templates, which then your end users can use.

Leveraging Naming Conventions If your files follow a specific naming pattern, employ the 'document name matches patterns' DLP condition with regular expressions (regex). Let's consider a scenario where files containing employee data follow a specific pattern.
Taking the example of an employee, Adele Vance, files related to her personal profile, possibly stored by HR, Payroll, or the Legal department, might be named as follows:
'Adele Vance Employee Record'
'Employee Data Adele Vance Performance Review 21.01.2024'
'New Employee Adele Vance Personal Details'
'Leaver Adele Vance Personnel Data'
While the filenames vary, certain phrases remain common across all employees. To identify these files, you can employ the regular expressions provided below. This specific regex is designed to recognise a pattern where any word or number (case insensitive) appears before and/or after the specified phrases:
Employee Record
Employee Data
Personnel Data
Personal Details
For instance, using a regex like /[[:print:]](?i)Employee Record[[:print:]]/gi allows you to identify files containing phrases like "Employee Record" regardless of the words or numbers around it.

Filtering by File Extension Specify conditions based on file extensions (e.g., .docx, .xlsx, .pdf) to target specific file types containing sensitive data.

What's particularly advantageous is the ability to combine multiple conditions within a single policy. For instance, you can combine a naming convention condition with a file extension condition to enhance the precision of your DLP policies.

The flexibility and versatility of these strategies empower you to safeguard sensitive information effectively. If you have any questions or need further clarification on these tactics, feel free to reach out—I'm here to help!
Thank you for reading!


Comments